🚀 Introduction
To improve our development workflow and avoid confusion in communication, we are now using Jira Software for all bug tracking and task management.
From now on:
❌ No bug reporting in WhatsApp
✅ All issues must be tracked in Jira
🎯 Objective
- Track all bugs in one place
- Assign clear responsibility
- Maintain history of fixes
- Improve team efficiency
URL : https://webzynix.atlassian.net/jira/projects?page=1&sortKey=name&sortOrder=ASC
🧪 For Testers – How to Raise a Bug
When you find an issue, follow this format strictly:
📝 Ticket Structure
Title:
[MODULE] Short description of the issueExample:
[LOGIN] Login button not working📋 Description Format
Pre-conditions:
(If any setup required before testing)

Steps to Reproduce:
1. Go to login page
2. Enter credentials
3. Click login

Expected Result:
User should be logged in successfully

Actual Result:
Page reloads / error shown

Attachments:
(Add screenshot or video if possible)
⚙️ Workflow Process
To Do → In Progress → Testing → Done
🔄 Step-by-Step Flow
🧪 Step 1: Tester
- Create ticket
- Status → To Do
👨💼 Step 2: Admin (Manager)
- Review ticket
- Assign to developer
👨💻 Step 3: Developer
- Move ticket → In Progress
- Fix the issue
- Move → Testing
🧪 Step 4: Tester
- Verify the fix
- If correct → Done ✅
👥 Roles & Responsibilities
🧪 Tester
- Raise bugs with proper details
- Verify fixes
👨💻 Developer
- Fix assigned issues
- Update status properly
👨💼 Admin
- Assign tickets
- Monitor progress
⚠️ Important Rules
- ❌ No incomplete tickets
- ❌ No WhatsApp bug reporting
- ✅ Always add screenshots
- ✅ Always follow proper format
💡 Best Practices
- Use module tags like:
[LOGIN][PAYMENT][DASHBOARD]
- Keep titles short and clear
- Always update ticket status
👥 Roles & Responsibilities
🧪 Tester
- Raise bugs with proper details
- Verify fixes
👨💻 Developer
- Fix assigned issues
- Update status properly
👨💼 Admin
- Assign tickets
- Monitor progress
Example for Ticket Creation
Step 1: Login into Jira
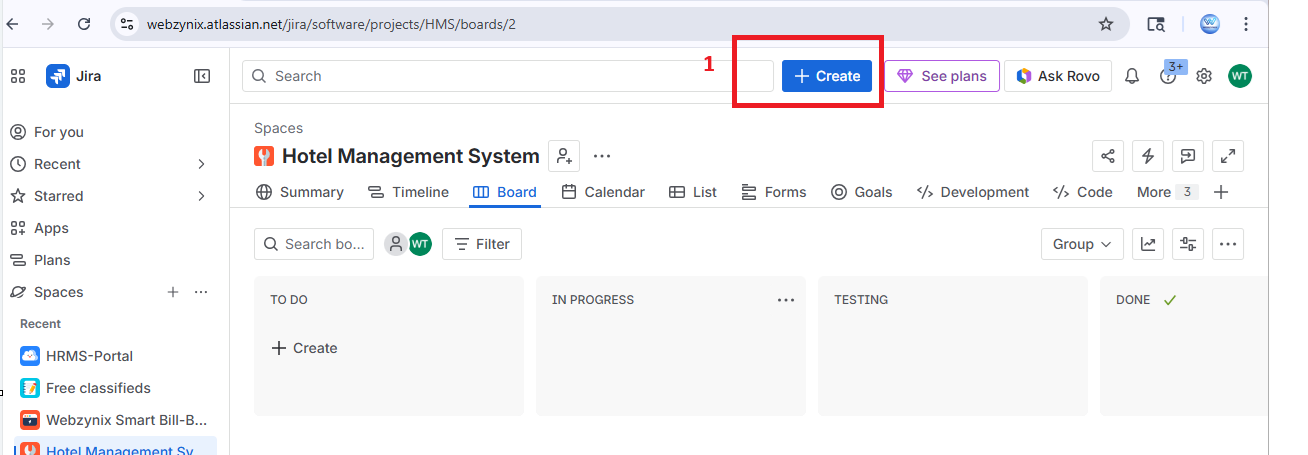
Step 2: On top right beside Search box will have a +Create icon button with blue color, click on it (it will open the form)
Step 3:
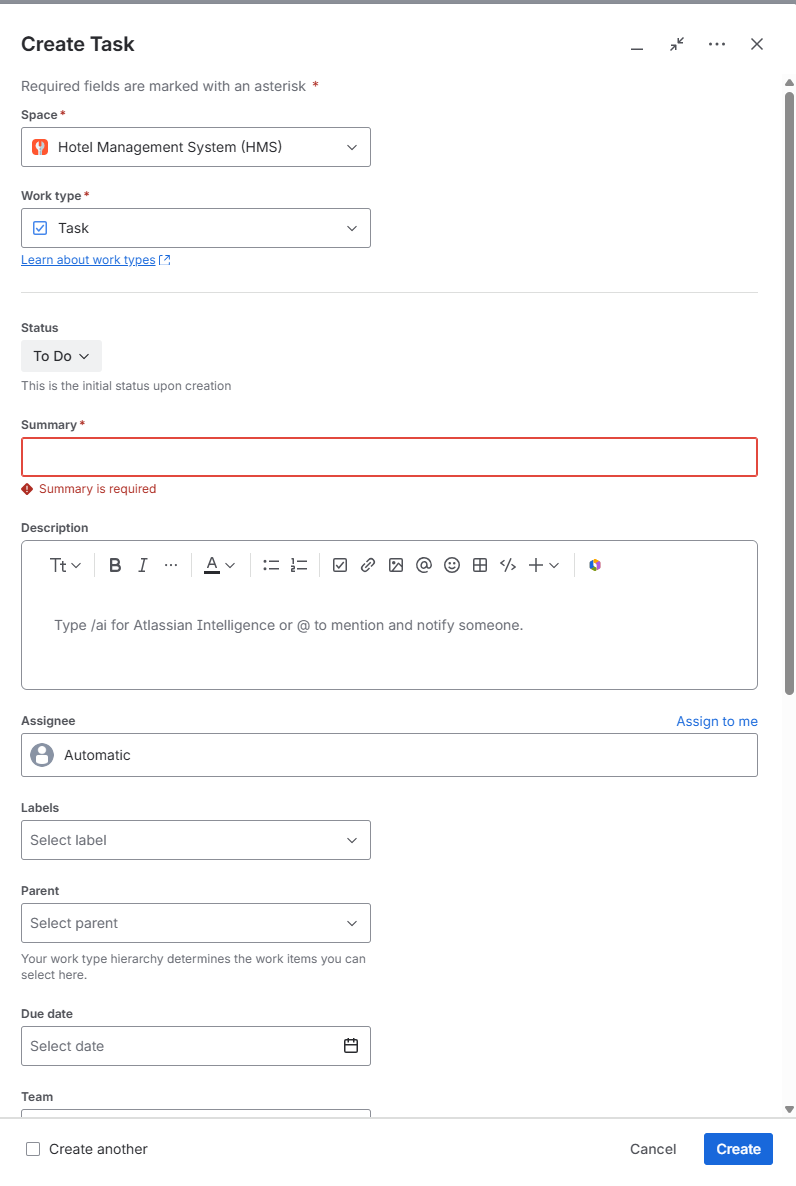
1) Space : Select the respective project
2) Work type : Bug
3) Summary : Titel of the issue (ex: [LOGIN] Login button not working)
4) Description : Pre-Configurations(if any) , Repeat steps, Expected Result, Actual Results
Example:
Pre-condition: User is on login page
Steps to Reproduce:
1. Enter username & password
2. Click login
Expected Result: User should login
Actual Result: Page reloads / error
(as much as possible info)
5) Assignee : Respective project Developer (if not aware who is developer, then assign it to admin )
6) Due Date & Start Date will update by Admin after review the bug.
7) Reporter : Bug creator
8) Fix versions : Dev/admin team will update the Fix version of bug.
9) Attachment : if any there
10) Linked work items : Dev/admin team will update

Comments
No comments yet.