
## Introduction
Are you a developer who wants to share your **locally running website** with testers, clients, or team members — without deploying to a server, paying for hosting, or exposing your source code?
**Cloudflare Tunnel** is the answer.
Cloudflare Tunnel creates a secure, encrypted connection between your local machine and the internet — completely free. No server. No port forwarding. No firewall changes. Just a public URL that points directly to your localhost.
In this guide, you'll learn everything from scratch — what Cloudflare Tunnel is, what you need before starting, how to install it, and how to configure it step by step.
## What is Cloudflare Tunnel?
Cloudflare Tunnel (formerly known as **Argo Tunnel**) is a free tool by Cloudflare that lets you expose your local web server to the internet through a secure tunnel.
Instead of this:
Your PC (localhost) → ??? → Internet (not reachable)
You get this: Your PC (localhost) → Cloudflare Tunnel → Public URL → Anyone can access
Your code, database, and files **never leave your machine**. Visitors only see the running website.
## Who Should Use This?
- **Anyone** who wants a free staging environment without renting a server
## Pre-Requirements
Before you begin, make sure you have the following ready:
### 1. A Running Local Web Server
Your PHP project must be running on localhost (Laptop/desk). You can use any of these:
| XAMPP | http://localhost/yourproject | Windows/Mac/Linux |
| WAMP | http://localhost/yourproject | Windows |
| Laragon | http://localhost/yourproject | Windows (recommended) |
| MAMP | http://localhost:8888/yourproject | Mac |
| PHP Built-in | http://localhost:8000 | Any OS |
### 1.B Internet Connection
Your PC must be online and powered on while testers are accessing the tunnel.
### 1.C Operating System
Cloudflare Tunnel supports:
- Windows 10/11 (64-bit)
- macOS (Intel & Apple Silicon)
- Linux (Ubuntu, Debian, CentOS, etc.)
### 1.D Administrator / Terminal Access
You need permission to run commands in:
- **Windows:** Command Prompt or PowerShell (Run as Administrator)
- **Mac/Linux:** Terminal
### 2. A Free Cloudflare Account Setup and installation.
Sign up at [https://cloudflare.com](https://cloudflare.com) — no credit card required.
## Step 1: Create Your Free Cloudflare Account
1. Go to [https://cloudflare.com](https://cloudflare.com)
2. Click **Sign Up**
3. Enter your email and password
4. Verify your email address
5. Log in to your Cloudflare dashboard
> No domain or credit card is needed for basic tunnel usage.
## Step 2: Download & Install Cloudflared
`cloudflared` is the command-line tool that runs the tunnel on your machine.
---
### Install on Windows
**Option A — Using Winget :**
bash : winget install Cloudflare.cloudflared
**Option B — Manual Download(Recommended):**
1. Go to: https://developers.cloudflare.com/cloudflare-one/networks/connectors/cloudflare-tunnel/downloads/
Or https://github.com/cloudflare/cloudflared/releases/latest
2. Download `cloudflared-windows-amd64.exe`
3. Rename the file to `cloudflared.exe`
4. Move it to `C:\cloudflared\`
**Add to PATH (so you can run it from anywhere):**
1. Search for **"Environment Variables"** in Windows search
2. Click **"Edit the system environment variables"**
3. Click **"Environment Variables"**
4. Under **System Variables**, find **Path** → Click **Edit**
5. Click **New** → Type `C:\cloudflared\`
6. Click **OK** on all windows
---
path and file name should look like as shown in belwo image.
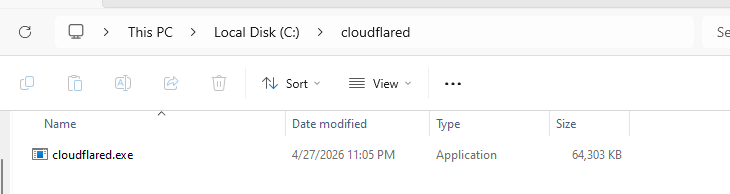
Now open CMD and rediected to C:\cloudflared\
now run the command like cloudflared.exe -url <Your local host URL>
Example:

Note which ever URL your access in your local path, example PHP project or react or flask etc.. any url application you can just replace your local url with the example url and run it.
**Pros:**
- Zero configuration
- Works in seconds
- No Cloudflare account needed
**Cons:**
- URL changes every time you restart
- Not permanent
> Best for: Quick demos, one-time sharing sessions
---
### Option B: Named Tunnel with Fixed URL (Recommended for Teams)
This gives you a **stable, reusable tunnel** that always works the same way.
#### 4B-1: Create a Named Tunnel
```bash
cloudflared tunnel create my-php-project
```
Output example:
```
Tunnel credentials written to:
C:\Users\You\.cloudflared\xxxxxxxx-xxxx-xxxx-xxxx-xxxxxxxxxxxx.json
Created tunnel my-php-project with id xxxxxxxx-xxxx-xxxx-xxxx-xxxxxxxxxxxx
```
**Save your Tunnel ID** — you'll need it in the next step.
---
#### 4B-2: Create the Configuration File
Create a new file at:
- **Windows:** `C:\Users\YourName\.cloudflared\config.yml`
- **Mac/Linux:** `~/.cloudflared/config.yml`
Paste this content:
```yaml
tunnel: YOUR-TUNNEL-ID-HERE
credentials-file: C:\Users\YourName\.cloudflared\YOUR-TUNNEL-ID.json
ingress:
- service: http://localhost:80
```
> Replace `YOUR-TUNNEL-ID-HERE` with the actual ID from the previous step.
> For Mac/Linux, replace the path with `~/.cloudflared/YOUR-TUNNEL-ID.json`
If your project runs on a different port, update the port number:
```yaml
# For port 8080
- service: http://localhost:8080
# For MAMP on Mac
- service: http://localhost:8888
```
---
#### 4B-3: Run the Named Tunnel
```bash
cloudflared tunnel run my-php-project
```
You'll see output like:
```
INF Starting tunnel tunnelID=xxxxxxxx
INF Registered tunnel connection connIndex=0
```
Your tunnel is now live!
---
```
Your testers open the URL in their browser and see your website — **exactly as it runs on your local machine**.
### What testers CAN and CANNOT see:
| Access | Tester |
|--------|--------|
| ✅ Website pages and features | Yes |
| ✅ Forms, logins, dashboards | Yes |
| ✅ All user roles (admin, client, etc.) | Yes |
| ❌ Your PHP source code | No |
| ❌ Your database | No |
| ❌ Your .env or config files | No |
| ❌ Your file or folder structure | No |
---
## Step 6: Auto-Start on Windows Boot (Optional)
So you don't have to manually run the tunnel every time:
```bash
# Install cloudflared as a Windows service
cloudflared service install
# Start the service
net start cloudflared
# Stop the service
net stop cloudflared
# Check status
sc query cloudflared
```
-
```
## Common Issues & Fixes
| Problem | Cause | Fix |
|---------|-------|-----|
| `cloudflared: command not found` | Not added to PATH | Re-check PATH setup in Step 2 |
| `502 Bad Gateway` | Local server not running | Start XAMPP/WAMP/Laragon first |
| `Connection refused` | Wrong port number | Check your local server port |
| `Tunnel not found` | Wrong tunnel name | Run `cloudflared tunnel list` to see names |
| Browser opens but hangs | Firewall blocking | Allow cloudflared through Windows Firewall |
| URL not working for testers | Tunnel stopped | Restart tunnel on your PC |
---
## Frequently Asked Questions
**Q: Is Cloudflare Tunnel completely free?**
Yes. The basic tunnel feature is 100% free with no trial limits or expiry.
**Q: Does my PC need to stay ON for testers to access the site?**
Yes. Your machine must be running with the tunnel active for anyone to access the URL.
**Q: Can I use this for production websites?**
It's best suited for development and staging.
**Q: Is my code safe? Can Cloudflare see it?**
Cloudflare only routes the HTTP traffic. Your source files and database remain entirely on your local machine.
**Q: Can multiple testers access at the same time?**
Yes. Multiple people can use the same public URL simultaneously.
**Q: What if I restart my PC?**
If you installed it as a service (Step 6), it auto-starts. Otherwise, re-run `cloudflared tunnel run my-php-project`.
## Conclusion
Cloudflare Tunnel is one of the most powerful free tools available for PHP developers. It lets you:
- Share your local project with testers instantly
- Keep your source code and database completely private
- Avoid expensive hosting during the development phase
- Get real feedback without any deployment process
Whether you're building a multi-user admin dashboard, an e-commerce platform, or a client portal — Cloudflare Tunnel gives your testers access without ever risking your codebase.
**Start using it today — it takes less than 10 minutes to set up.**
---
Published by WebZynix Blog | Tags: Cloudflare, PHP, Development, Staging, DevOps
Comments
No comments yet.